1. Go TeamView.com or click HERE
2. Go to the DOWNLOADS link and click on it
3. Once you click on the DOWNLOADS link it should take you to a download page. Scroll down until you see a screen like the one below and click on the Download now button
4. Once you click on the Download now button it will take to another page and will automatically prompt you to save the file. (Sometime the browser do not prompt you to save the program, if this is the case click on the direct download link at the top. See below)
5. Once the file is downloaded it should be at the bottom of the screen. Just click on the file once to run the program.
9. Now you should see another screen. If you are running TeamViewer for the first time an Ad might pop up, if this is the case just click on the Close link at the bottom right.
10. After you click on Close to close the ad, you should see another screen that looks like the one below.
11. On this screen you should see YOUR ID and PASSWORD box in blue. Give this to your IT support person and they will be able to login to your system to support you. Also make sure you DO NOT close this window because if TeamViewer is not running the person trying to remote will not be able to remote in.
1. Go TeamView.com or click HERE
2. Go to the DOWNLOADS link and click on it
3. Once you click on the DOWNLOADS link it should take you to a download page. Scroll down until you see a screen like the one below and click on the Download now button
4. Once you click on the Download now button it will take to another page and will automatically prompt you to save the file. (Sometime the browser do not prompt you to save the program, if this is the case click on the direct download link at the top. See below)
If the browser does starts the download it will be displayed at the bottom of the browser.
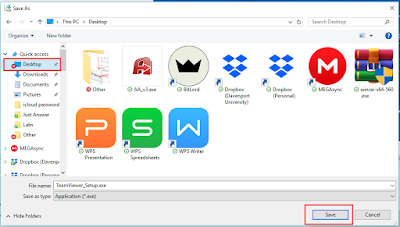
6. Now you should see a popup window asking if you want to save the file. Click on Desktop and click Save
7. Once you clicked on the Save button, go to your Desktop, find the icon TeamViewer_Setup.exeand double click on it. Once you double click on it it should prompt a window and ask if you want to make changes just click on YES
8. Once you click on the Yes button another screen will pop up like the one below.
9. Now you should see another screen. If you are running TeamViewer for the first time an Ad might pop up, if this is the case just click on the Close link at the bottom right.
10. After you click on Close to close the ad, you should see another screen that looks like the one below.
11. On this screen you should see YOUR ID and PASSWORD box in blue. Give this to your IT support person and they will be able to login to your system to support you. Also make sure you DO NOT close this window because if TeamViewer is not running the person trying to remote will not be able to remote in to your computer.


0 comments:
Post a Comment