By Nhat Nguyen at 12:00 PM
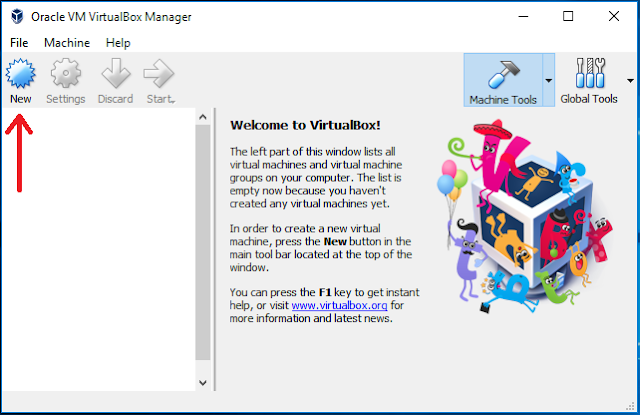
1. Open your VirtualBox and click on New
2. Type in the name of the operating system you want to install, select the type and version and click Next
3. Set your memory size, make sure the option Create a virtual hard disk now is selected and click on Create.
4. Set your hard disk size (I recommend at least 40GB). Under Hard disk file type you can select any of the top three options (I recommend VDI or VMKD) and for the Storage on physical hard disk select Dynamically allocated. Click on Create once you are done.
5. Click on Settings
6. Follow the number below from 1 - 5. Live CD/DVD is optional
7. Navigate to your ISO file and click on Open
8. Once you are back at the Settings screen click on OK
9. Now click on the Ubuntu VM and click on Start button
10. Wait for Ubuntu to start up. While waiting just close the notifications at the top if there is any.
11. Click on Install Ubuntu
12. If at any time you are prompt with a screen like the one I have below just click on Do not show this message again and click on Capture
13. Once you clicked on the Install button you will see a screen like below. Choose your Keyboard Layout, language and click on Continue
14. Select Normal Installation, Download updates while installing Ubuntu, and Install third-party-software and click Continue
15. Select Erase disk and install Ubuntu and click Install Now. Encryption and use LVM is optional
16. Click Continue
17. Choose your location on the map and click Continue
18. Fill out the form, set up the password, select whether you want Ubuntu to log in automatically or require a password and click Continue.
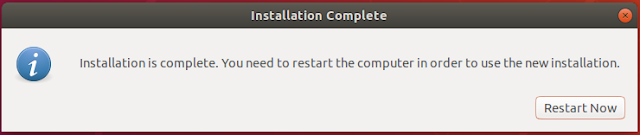
19. Wait for the installation to complete.
20. Click Restart Now button
21. Wait for Ubuntu to restart. At this part, if it freezes for whatever reason just click on Machine at the top and go down to reset to reboot the machine and it should work.
22. Once you are logged in to Ubuntu you will see some tutorial. To get rid of this screen just click on the Next button on the top right.


0 comments:
Post a Comment