
For this tutorial, I will be going through some of the hardware configurations that are available in VM you can change to make your VM runs better.
1. Click on VM, go down to Settings and click on it.

2. This will open a dialog showing you all of the hardware available on your host machine.

Processor
1. Click on Processors under Device and you should now see a screen containing option for the processor on the right.

2. On the right you can adjust the number or processor you want to dedicate to your VM. To change the number of processor cores per processor just click on the drop-down arrow and choose the number you want to dedicate to your VM. Remember that the maximum number of processor cores you can set will depend on how many processors or cores your host computer currently has.
Virtualization engine
1. Virtualize Intel VT-x/EPT or AMD-V/RVI - When this checkbox is checked, VM will give you the ability to run VM inside another VM. Although this does not sounds like a good idea because it will slow down your VM tremendously but some IT professionals use this to test virtualization product before they put it into the normal VM. If you are not testing anything than this box should never be checked.
2. Virtualization CPU Performance counters - When this is enabled you can migrate the virtual machine only to a host that have compatibility CPU performance counters.
3. Virtualize IOMMU (IO memory management unit) - Click Here to learn about Virtualize IOMMU
CD/DVD (SATA)

1. Click on the CD/DVD (SATA) to view the option for CD/DVD. Under CD/DVD you can browse for an ISO file or use the default setting to automatically detect CD/DVD on the host computer. The Connect at power on the option is just to allow the VM to automatically connect to the host computer CD/DVD when it is turned on.
Network Adapter
1. Click on Network Adapter to view the option for Network Adapter. Under Network Adapter you can see that there are several ways you can connect your VM to the network.
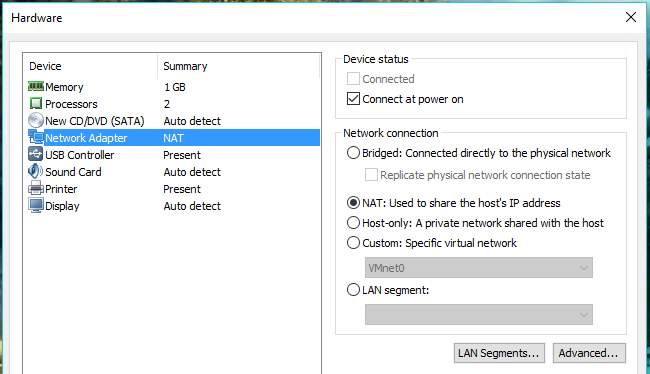
2. Connect at power on - Allow your VM to automatically have a network card when it is turned on
3. Bridge: Connected directly to the physical network - As the name implies, this option “bridges” the virtual network to the physical network. This means that the virtual machine will appear to the network as an identifiable separate machine. It will even ask the local DHCP server (if any) for its IP address (See screenshot of the command prompt below) and will appear in the DHCP leases of that DHCP server as a separate machine with a unique MAC address.

This connection will allow the virtual machine to offer resources to the network. For example, it can host a file server, a web server or any sort of server you need. You do not need to have a separate physical machine to host your home server: it can be a VM on your always-on desktop.
This option is also called Auto-bridging because it will automatically detect a functional LAN card installed on the host machine
Network Adapter Advanced Settings
1. Advanced Settings - This option allows the VM to simulate different bandwidths with its own packet loss. The same dialog box can be used to modify or generate the MAC address of the network card.

2. NAT: Used to share the host's IP address - This is the most common configuration and the default for a newly created machine is to NAT. In this configuration, the host will act as a router that hides the virtual machine behind it. The virtual machine will have access to the network through the default connection of the host. To other devices on the network, all traffic will appear to be coming from the host. This means that although a virtual machine should be able to access network resources (and the Internet), it will not be able to offer resources to the network. This network connection will have its own private range that is assigned by DHCP
3. Host-Only: A private network shared with the host - This option can be used when you do not want the virtual machine to see the rest of the network or the Internet. This network connection can also take its IP through DHCP (See below), but the IP range will be different than that of NATed machines

4. Custom: Specific virtual network - The fourth option is actually nine different options (See below), three of which we have already discussed. They include Auto-bridging, NATing and host-only. The other six options are available for you to use or to customize.
For example, you can have separate test environments that do see each other or the host: Environment A that contains a domain controller(s), member server(s) and some test workstation(s) on VMnet2. Environment B is a complete replica on VMnet3. Both environments can have the same IP scheme and never conflict as they are isolated from each other. This option is also great for testing VMs and/or applications that you do not trust without any risk to your host or network.

The true power of custom networks is the ability to customize them (which is not available in the same dialog screen). For that, you will need the Virtual Network Editor (See below) which can be used to edit all nine virtual networks.

In the Virtual Network Editor, you can specify to which physical network you want to map your virtual machine bridged network (Figure 1). Doing so will allow you to create a custom Virtual Machine network (VMnets) that is mapped to one of the other physical network cards (Figure 2).
This becomes very important if you need a multi-homed Virtual Machine like a router or a firewall. For example, if you want to test Microsoft ISA, you can bridge one of the network cards to the Internet while bridging the second to the rest of the network, offering your home/lab network filter/accelerated Internet.
It can also be very useful if you want different VMs to be on different Internet links. I have this setup for one of the customers I do remote support for. I once had a complete failure on the network which made me unable to connect remotely. Since then I've created a VM that is directly connected to a separate WiMax Internet link from the rest of the network. The VM has another NIC to give me visibility to the internal network.
You can also use the editor to edit the IP address ranges of NAT and Host-Only DHCP servers or disable it completely. An example of this occurs when you need to simulate a 192.168.100.0/24 network rather than the 192.168.13.0 /24 chosen in this setup for NAT Network.

Figure 1: Specify which physical network card to bridge VMs to

Figure 2: Two physical networks bridged to two different virtual networks

A multi-homed VM bridged to two different physical networks
The virtual machine network card can be configured to “connect at power on”. It can also be made “Connected” or ”Not connected” at any time while the virtual machine is running (Figures 13). It also has an advanced configuration that simulates different bandwidths with its own packet loss. The same dialog box can be used to modify or generate the MAC address of the network card.

Virtual network adapter advanced settings
Summary
A virtualization solution is never complete without the ability to virtualize the network. VMware Workstation capabilities in this regard are second to none; It can build and simulate different types of testing and production networks, put bandwidth limits and approximate different types of WAN and LAN networks.
USB Controller

USB Controller for all of your USB device need. You can set your VM to USB 2.0 or 3.0 depending on what your host computer has.
Sound Card

You can configure when a sound card is connected to a virtual machine. You can also configure whether a virtual machine uses a specific sound card or the default sound card in the host system.

You can specify monitor resolution settings, configure multiple monitors, and select accelerated graphics capabilities for a virtual machine. You can use the multiple-monitor feature when the virtual machine is in full-screen mode.
To use DirectX 9 accelerated graphics, the guest operating system must be Windows XP, Windows Vista, or Windows 7.
Only Workstation 6.x and later virtual machines support specifying resolution settings and setting the number of monitors that the guest operating system can use.

0 comments:
Post a Comment